When i first started this blog, my idea was to keep it as minimal as possible. The information should be the most important thing, so i decided to not use any images. After finishing the first posts i realized that when sharing these posts on Social media i'd need an image for the opengraph meta tags.
But i couldn't just "waste time" on creating images for each post. So i decided to automate this process with Python.
The Idea
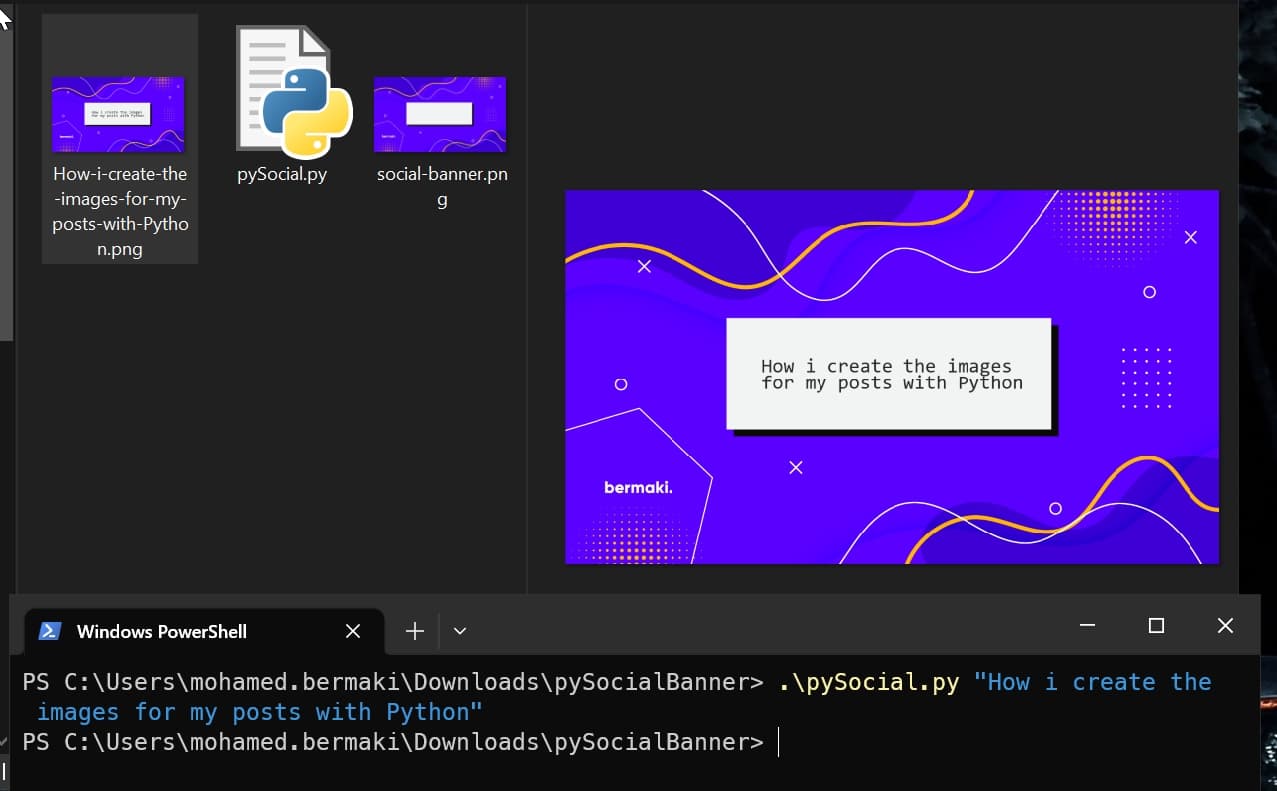
The idea was to create a script that takes the title of the post and creates an image with the title on it. I've already created a template with a box where the title should be placed, and in the script i'd have to give it some boundaries so that the title would fit in the box.
Installing the dependencies
pip install opencv-python pillow
The Script - Windows version
import cv2
from PIL import Image, ImageDraw, ImageFont
import argparse

def add_text_to_image(input_image_path, output_image_path, text, rectangle_coords, text_color):
    """
    Adds wrapped text to the input image within the specified rectangle, and saves the modified image.

    Args:
        input_image_path (str): Path to the input image file.
        output_image_path (str): Path to save the output image file.
        text (str): Text to be added to the image.
        rectangle_coords (tuple): Coordinates (x, y, width, height) of the rectangle where text should fit.
        text_color (str): Hexadecimal color code for the text color.
    """
    # Open the image using PIL to preserve transparency
    pil_image = Image.open(input_image_path).convert("RGBA")

    # Get a drawing context on the image
    draw = ImageDraw.Draw(pil_image)

    # Define a font (you can change the font and size as per your preference)
    font = ImageFont.truetype("consola.ttf", 36)

    # Get the width and height of the rectangle
    rect_x, rect_y, rect_width, rect_height = rectangle_coords

    # Split the text into words
    words = text.split()
    wrapped_lines = []
    current_line = words[0]

    # Wrap text within the rectangle
    for word in words[1:]:
        test_line = current_line + " " + word
        test_size = draw.textbbox((0, 0), test_line, font=font)

        if test_size[2] <= rect_width:
            current_line = test_line
        else:
            wrapped_lines.append(current_line)
            current_line = word

    wrapped_lines.append(current_line)
    wrapped_text = "\n".join(wrapped_lines)

    # Get the bounding box of the wrapped text
    wrapped_text_bbox = draw.textbbox((0, 0), wrapped_text, font=font)

    # Calculate the position to fit the wrapped text inside the rectangle
    text_x = rect_x + (rect_width - (wrapped_text_bbox[2] - wrapped_text_bbox[0])) // 2
    text_y = rect_y + (rect_height - (wrapped_text_bbox[3] - wrapped_text_bbox[1])) // 2

    # Add wrapped text to the image with the specified text color
    draw.text((text_x, text_y), wrapped_text, font=font, fill=text_color)

    # Replace spaces with hyphens in the text to generate the output image's name
    output_image_name = text.replace(" ", "-") + ".png"
    output_image_path = output_image_name

    # Save the image in PNG format to preserve transparency
    pil_image.save(output_image_path, "PNG")

# Example usage
if __name__ == "__main__":
    # Argument parser for getting text input from the command line
    parser = argparse.ArgumentParser(description="Add text to an image within a specified rectangle.")
    parser.add_argument("text", help="Text to be added to the image.")
    args = parser.parse_args()

    input_image_path = "social-banner.png"

    # Convert spaces in text to hyphens for the output image's name
    output_image_name = text.replace(" ", "-") + ".png"

     # Get text from command line argument
    text = args.text

    rectangle_coords = (354, 260, 494, 158)  # (x, y, width, height) of the rectangle
    text_color = "#2a2a2a"  # Hex color code for the text color

        # Use the generated output image name
    output_image_path = os.path.join(script_dir, output_image_name)

    add_text_to_image(input_image_path, output_image_path, text, rectangle_coords, text_color)
The Script - macOS version
I have to modify the script to get it to work on macOS, since i was getting an OSError when trying to use the consola.ttf font.
In macOs we'll have to put the font in the same directory as the script, and then use the os.path.join method to get the path to the font.
import cv2
from PIL import Image, ImageDraw, ImageFont
import argparse

def add_text_to_image(input_image_path, output_image_path, text, rectangle_coords, text_color, font_path):
    """
    Adds wrapped text to the input image within the specified rectangle, and saves the modified image.

    Args:
        input_image_path (str): Path to the input image file.
        output_image_path (str): Path to save the output image file.
        text (str): Text to be added to the image.
        rectangle_coords (tuple): Coordinates (x, y, width, height) of the rectangle where text should fit.
        text_color (str): Hexadecimal color code for the text color.
    """
    # Open the image using PIL to preserve transparency
    pil_image = Image.open(input_image_path).convert("RGBA")

    # Get a drawing context on the image
    draw = ImageDraw.Draw(pil_image)

    # Define a font (you can change the font and size as per your preference)
    font = ImageFont.truetype(font_path, 36)

    # Get the width and height of the rectangle
    rect_x, rect_y, rect_width, rect_height = rectangle_coords

    # Split the text into words
    words = text.split()
    wrapped_lines = []
    current_line = words[0]

    # Wrap text within the rectangle
    for word in words[1:]:
        test_line = current_line + " " + word
        test_size = draw.textbbox((0, 0), test_line, font=font)

        if test_size[2] <= rect_width:
            current_line = test_line
        else:
            wrapped_lines.append(current_line)
            current_line = word

    wrapped_lines.append(current_line)
    wrapped_text = "\n".join(wrapped_lines)

    # Get the bounding box of the wrapped text
    wrapped_text_bbox = draw.textbbox((0, 0), wrapped_text, font=font)

    # Calculate the position to fit the wrapped text inside the rectangle
    text_x = rect_x + (rect_width - (wrapped_text_bbox[2] - wrapped_text_bbox[0])) // 2
    text_y = rect_y + (rect_height - (wrapped_text_bbox[3] - wrapped_text_bbox[1])) // 2

    # Add wrapped text to the image with the specified text color
    draw.text((text_x, text_y), wrapped_text, font=font, fill=text_color)

    # Replace spaces with hyphens in the text to generate the output image's name
    output_image_name = text.replace(" ", "-") + ".png"
    output_image_path = output_image_name

    # Save the image in PNG format to preserve transparency
    pil_image.save(output_image_path, "PNG")

# Example usage
if __name__ == "__main__":
    # Argument parser for getting text input from the command line
    parser = argparse.ArgumentParser(description="Add text to an image within a specified rectangle.")
    parser.add_argument("text", help="Text to be added to the image.")
    args = parser.parse_args()

    input_image_path = "social-banner.png"

    # Get text from command line argument
    text = args.text

    # Convert spaces in text to hyphens for the output image's name
    output_image_name = text.replace(" ", "-") + ".png"

    # Get the path to the script's directory
    script_dir = os.path.dirname(os.path.realpath(__file__))

    # Specify the font file (consola.ttf) in the same directory as the script
    font_path = os.path.join(script_dir, "consola.ttf")

    rectangle_coords = (354, 260, 494, 158)  # (x, y, width, height) of the rectangle
    text_color = "#2a2a2a"  # Hex color code for the text color

    # Use the generated output image name
    output_image_path = os.path.join(script_dir, output_image_name)

    add_text_to_image(input_image_path, output_image_path, text, rectangle_coords, text_color, font_path)
Usage